Monday, March 23, 2020

HAPPY BIRTHDAY!

We just celebrated this dude's 10th birthday! It's crazy... I just can't believe I have a 10 year old already. For his birthday, we invited 8 of his friends to come join us for a sleepover birthday party. He had an absolute blast!

When I looked through the patterned papers from Fancy Pants Designs' Cake Smash Collection, the plaid and yellow patterns really caught my eye and I knew I wanted to use them on a layout together! And I love how they look paired up. They are bright and happy, perfect for creating a birthday layout!!


There are lots of fun embellishments in this collection and I managed to squeeze bits and pieces on this layout. I love embellishments...


I added the puffy stickers inside the stars and balloons to add dimension. I wasn't sure how I was going to squeeze the number 10 on here, but I managed!!


I actually worked my design around this large "birthday" die cut" and then I added the "make a wish" to the center of the die using foam squares.


What do you think of Fancy Pants Designs' newest Cake Smash collection. Isn't it fun?! You can grab yours from the website! Click here! Save 10% using coupon code NICOLEMARTEL!

Thanks for visiting today!


Wednesday, March 18, 2020

CLICK CLICK CAPTURE

One of the things I love about Art Journals is that I can do whatever I want in them! Most of the time, when I'm bored, I will grab my art journal and splash some mist and paint on a page... then I let it sit overnight and go back to it during the week... adding a few things here and there. And that is EXACTLY what I did with this spread.


I love the purples, pinks, blues and oranges on this layout... I don't even know why I chose these colors... I simply started  brushing my Coloration Sprays from Art Antholog (Sky, Juicy, Ink Spot, Patience) onto the spread after applying clear gesso to the page so it would not tear. I chose colors to the kraft page that inspired me at the moment. It was SOOOOO therapeutic for me. I just love playing with mixed media product when I have the time.


I glued a piece of burlap onto a kraft tag to use as my frame for the photo. Then I punched a floral mat using a metal die from Pinkfresh Studio to tuck behind the tag.


The "love" snippet was actually a journaling card that I cut in half to use as my title! Initially I was going to color inside the letters using markers, but I decided against it since I already had lots of colors on this spread. ;)


I added a few embellishments from my stash here and there. I finally got to use the "click click capture" flair from 7 Dots Studio. I've had this flair in my stash for a few years...waiting for the right project to use it on. It's perfect. And... I did not even come across it until I had the page painted... it just happened to work out.


At the last minute, I decided to add the moon dream catcher die cut to frame the left-side of the photos. It really changed the whole dynamic of this spread and I LOVE it!


What do you think? Have you given art journaling a try? I just started art journaling last year and I am in love with this new way of recording and capturing my memories!


Thursday, March 12, 2020

HAPPY BIRTHDAY

Good morning! I have another fun birthday layout I created using Fancy Pants Designs' newest Cake Smash Collection. Loving the color palette in this collection...especially the yellow and lime green.

A few weeks ago, I woke Edward up on his birthday and asked him how he felt about going to Grumps for breakfast before school. His response was, "Wait...and like, go into school late?" To which I replied, "exactly!" He smiled and said cool! I am so glad I did this for him. It totally made him happy and he ended up having a fantastic day at school! Gosh, I love him... He is so handsome! 

I used quite a few patterns on this layout... I didn't plan on it... it just happened. :) I love to play with multiple patterns when I can make it work for my layout.


I added a few pieces of die cuts and puffy stickers here and there. And I really like how the chipboard cake and party hat looks next to the journaling block. It frames the journaling nicely.


I added a tag and frame at the bottom to fill in the white space along with a few more die cuts.


Here is a closer look at the chipboard. Fab!


What do you think? Are you ready to grab this collection and recording those birthday party memories! Click here to grab yours today and use coupon NICOLEMARTEL to save 10%.

Thanks so much for visiting today!

Tuesday, March 10, 2020

ME & YOU

Good morning! Altenew has another fun challenge up on their blog for March and I love the color palette! I wouldn't normally scrap this color combination and that is why I love challenges! Challenges help me step out of my comfort zone a bit... Click here to join the challenge!


To begin, I sprayed some Sky Coloration Spray from Art Anthology onto white cardstock. Once the spray ink was completely dry, I used Art Anthology's Flitty stencil and Altenew's Sea Glass and Bamboo Crisp Dye Inks to create the flowers from the stencils.


Then I used a blending tool to blend the same colors onto white cardstock. Once I was satisfied with the blending, I stamped the flowers over the ink and cut them out. Isn't it pretty. The flowers are from Altenew's Smile More Stamp Set. I use this set often because the flowers are gorgeous!


I really like the blue background on this layout. It's hard to see in the photo, but here's a close up.


I used Altenew's Artist Marker (C002) to color the stitched frame so that all of the colors blend nicely. I sprayed the white ribbon with the Plush Coloration Spray from Altenew. It's been awhile since I used ribbon on my projects! I need to use them more often!


I used Pink Paislee's Bloom Street collection to embellish the layout. I really love the stickers from this collection. The colors are beautiful.


Thanks for stopping by today!


Sunday, March 08, 2020

YOU MAKE MY HEART FLUTTER

Good morning. Happy Sunday! I finally got to use my new Pink Paislee stuff that I ordered about a month ago. Loving the floral stickers and butterflies!!! Soooo pretty. The green adds a nice touch, wouldn't you say?


To begin, I used Art Anthology's Granny Smith Coloration Spray to add color to the white cardstock. Then I used a pink pen and ruler to add the border. I used the Narrow Card and bookmark metal die and Blending Buddy tools from Trinity Stamps to frame the adorable photo! I used Catherine Pooler's Lime Rickey to color the card.


I was sooooo sad this week. I completely ran out of foam squares sooooo I cheated a bit. I cut two tiny pieces of chipboard from packaging and glued them together to get the height that I wanted and then I glued them together. You can hardly tell the difference. I just ordered some foam squares and adhesives from Creative Memories. I should have them this week! Yay.


I clustered a variety of stickers together until I was happy with the look. I just love this... Paige Evans did a fantastic job on this collection for Pink Paislee!


Here's a closer look at the embellishments at an angle. Gorgeous, right!?

I added a few gems to the center of the butterflies to add dimension. I wanted a little bling on this layout and this worked out perfectly.


Thanks so much for visiting today!


Saturday, March 07, 2020

THERE IS SUNSHINE IN MY SOUL TODAY

Good morning! Have you seen Trinity Stamp's newest release? There are so many beautiful stamps from this past month's release. I simply want them ALL. My favorite is the Love You Bunches Stamp Set. I am a sucker for pretty flowers! I never used to be a flower person until I started playing around with stamps a few years ago. :)


I've been trying to finish my vacation mini album from our cruise in December. I am almost done. I really love how this stamp set looks with the photo of me and Edward on the ship with Half Moon Cay in the background. It's so pretty and perfect!


To begin, I stamped the image onto a piece of 6x8 patterned paper. Before applying the stamp, I had a general idea as to where I wanted to place the photo...


I colored all of the flowers and leaves using lighter shades and then I traced around the flowers and leaves using a slightly darker color to really add dimension to the flowers. I'm no pro at coloring... but I really love alcohol brush markers. These markers blend so well! Notice the flowers have a nice even color.

To complete the spread, I added a few sentiments and embellishments here and there. I wanted to keep it simple, focusing on the photos and cluster of flowers!


Thanks so much for visiting today! I hope you have fabulous weekend!

Monday, March 02, 2020

YOU

Seriously... it's March already? I can't believe it! Today I'm sharing a layout I created for Pinkfresh Studio's March challenge. I happen to have some new product and the color palette really caught my eye! I have not scrapped in 8 days... I have been so sick. I am just starting to feel like my normal self. It feels good to create again!

For this layout, I wanted to just play... and have fun with all different types of embellishments from stamps, metal dies, gems, stickers and die cuts... It has it all. I used the stitched tags to frame my photo.


Here is the challenge for March! And it's all about frames! Click here to submit your entries!


To begin, I sprayed different Coloration Sprays from Art Anthology onto white cardstock. Then I used my die cutting machine to create a few stars for the background of my layout.


The stars look great, don't they? I used a few different stamps throughout the layout so that it had a nice flow. And yes... I added pink gems on a boy layout... :)


I cannot get enough of the puffy stickers... LOVE them so much. :) A added a few puffy stickers here and there and added a few in the middle of the stars.


Embellishment galore! It looks like something from the candy store. LOL. 


Thanks for visiting today!


Sunday, March 01, 2020

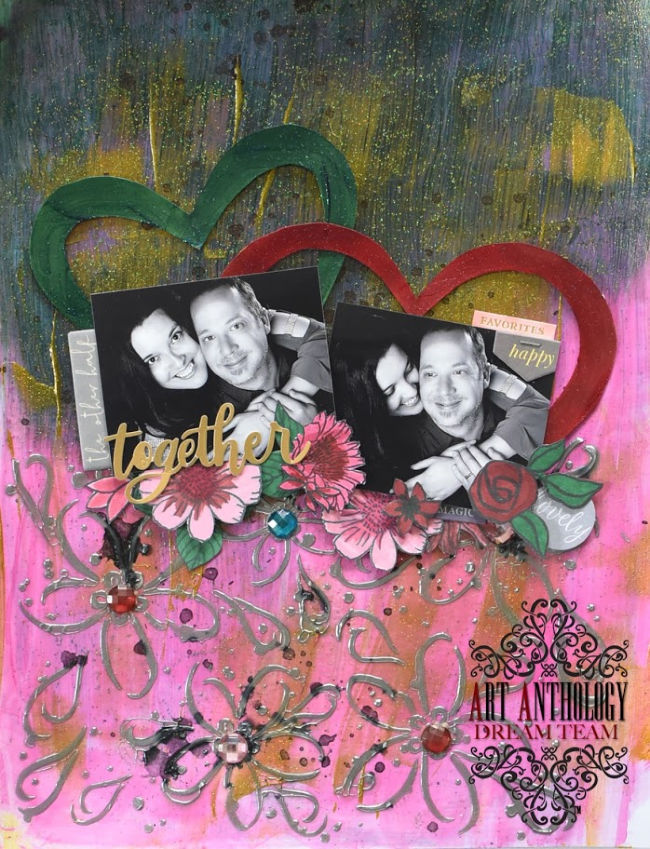
TOGETHER


Hello everyone! Do you ever feel giddy when completing a crafty project? I don't usually get really excited about my work, but this layout has me feeling giddy and happy! This must be one of the longest projects I have ever created on a layout... I worked on this piece for a good two hours...but the end result is totally worth while. I just love it!


To begin, I mixed a little bit of the  Flamingo Sorbet Dimensional Paint with some of the Glass Sorbet Dimensional Paint to lighten up the color a bit. I wanted more of a bubblegum pick background. I used a silicone brush to scrape the paint across the cardstock so the paint was nice and even. 


Once the pink was dry, I added a few layers of the Mermaid Sorbet Dimensional Paint across the top of the layout. I added about four layers of the Mermaid paint so the color would be as vibrant as possible. This took time because I had to make sure each layer was completely dry before applying the next layer, otherwise the paint would look muddy.


After the paint was completely dry, I decided to add some of the Vegas Gold Dimensional Paint. The colors look soooooo pretty together! I used the Metal Effects Dimensional Medium and Flity Stencil to create silver flowers at the bottom of the layout.


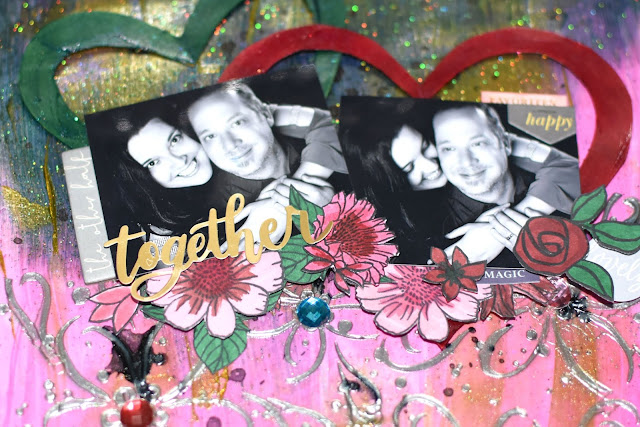
Since I only had clear jewels I used my markers to color them! They look perfect! Then I cut two hearts free-handed from cardstock and painted them to use as frames for the layout.


Since I didn't have any embellishments that would go well with the colors with the exception of a few stickers I used stamps and markers from Altenew to create the flowers! This took a lot of time, but I enjoyed the process!


Products Used:

Sorbet Dimensional Paint (Glass, Vegas Gold, Flamingo, Mermaid)
Metal Effects Dimensional Medium
Flity Stencil
Coloration Spray: Raider
Stamps/Markers: Altenew
Embellishments: Citrus Twist/Pink Paislee, Heidi Swapp

What is your favorite thing about this layout? I love everything about it!