Saturday, December 26, 2020

OH, THE PLACES YOU'LL GO!

I'm sure I'm not the only one who hopes 2021 will be a better year... As I was backing up my photos from 2020, I was sad to see a small amount of photos taken throughout the year. Normally, I have about a 1,000 pictures, but not this year... Because of this, I don't have many pictures to scrapbook. 

But, I snapped this photo of mom and I at the beach and I love it. :) Don't we look relaxed? We spend a long weekend at Marc's beach house this summer just to get away...out of our homes.


For this layout, I used a variety of journaling cards, tags, puffy stickers and stickers from Elle's Studio. I love playing with embellishments. The stamp is from Studio Forty!


Lots of pretty rainbow colors... this layout makes me so happy... it's a feel good layout, for sure. Early this year, I started playing with the travel notebook size... and I really like it for when I only have one photo to scrapbook.


Thanks so much for visiting today. Hope you're having a wonderful weekend!


Tuesday, December 22, 2020

SHAKE YOUR MERRY MAKER ZIP POUCH CREATED WITH ARTESPRIX'S SUBLIMATION MARKERS!

Happy holidays! I have been making fun projects for the holidays. I thought it would be neat to create a holiday zip case to hold some candy and gift card as a gift! Something cute and fun. Maybe, add a card inside as well. I'm super pleased with how this turned out! That Santa makes me happy! 


Materials:

Gnomie Botanical Sublimation Markers

Poly Canvas Zip Case

Plain Copy Paper

Sublimation Ink Pad

Acrylic Stamp Block

Heat Tape

Protective Paper

Heat Source: Artesprix Heat Press, Dry Iron, or Home Iron

Artesprix Protective Project Mat

Trinity Stamp's Shake Your Merry Maker Clear Stamps


Step-by-Step Tutorial:

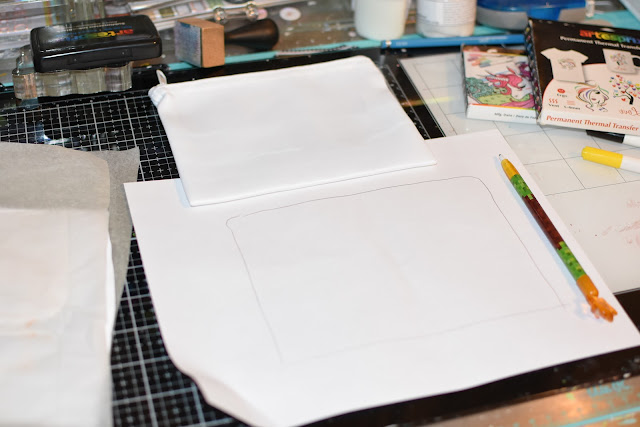
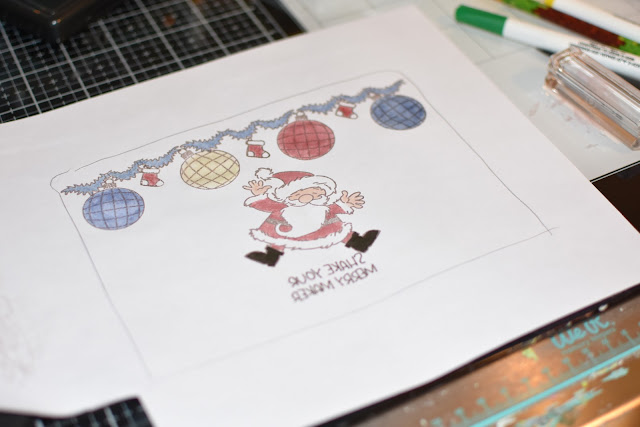
Step 1. Place the Poly Canvas Zip Case on a piece of plain copy paper and trace the outline using a pencil to determine the area that you have to work on. Then, stamp the images within the rectangle using the Sublimation Ink Pad.


Helpful tip: Use a lightbox to create your mirrored texts.


Step 2. Color in the images using the Sublimation Markers. 


Step 3. Using the Artesprix Heat Tape, tape your blank down to your design.


Step 4. Turn your heat press on and set the temperature to 400 degrees Fahrenheit and the timer for 45 seconds.


Step 5. Create your sublimation sandwich. Cut two pieces of Protective Paper to cover your project on the top and bottom. Place a small piece of protective paper inside the canvas to prevent the ink from bleeding through the canvas. Place it inside the Heat Press (making sure the zipper is placed on the outer edge of the heat press) and close the machine. The Heat Press will beep indicating that your project is finished!

Step 6. While wearing protective gloves, lift the handle and remove your Poly-Canvas Zip Case. Place it on the Protective Project Mat and give it about 2 minutes to cool down. Gently remove the paper to reveal your vivid design!


Step 7. Glue desired embellishments onto the bag and allow the glue to try. Tie a piece of ribbon through the zipper. 


There's still time to make a few of your own before the holidays! Stop by the shop and grab a few products to get started! Click here to start shopping.

Thanks so much for stopping by today!


Sunday, December 20, 2020

JUST LOVE IT

Good morning! Just popping on to share this layout I created using Studio Forty's So Romantic Collection. I was really drawn towards to the pretty floral paper! But I'm not a big flower person so I thought I'd use it as a frame for the base and it worked out perfectly. Normally, I do not create feminine layouts, but this...is beautiful! I love the simplicity of this layout, keeping the focus on the photo. 


I stamped the "Just Love it" image onto the journaling card and added the camera stamp as well. It added a nice touch to the journaling card. Then I added a few pearls, chipboard and stickers. I used a metal die to create the tag from a scrap piece of paper.


I used a light gray ink to stamp the "Loving This" and "Selfie" sentiment below the chipboard. I just felt that the layout was missing something below the photo. 


Isn't this beautiful. I love the embellishments on this layout. They all flow together nicely.


For my second layout, I thought I'd squeeze in one more summer layout before we head into Winter! I'm sure someone is celebrating summer in this world. :) The BOM DIA Collection has a variety of beautiful patterns and I love the color scheme. 

I used the Camera print paper for the background and then created the sun for the background by hand... I simply cut a variety of triangles from patterned paper and then a circle. Sure... I could have used my Silhouette, but this technique was faster and I actually like how it turned out!


I added a variety of strips of patterns below the matted photo. I love all the patterns from this collection and it was super hard not to use them all!! I added a strip of lace to add more texture and depth. I just love how pretty the strips of patterns look together. I fussy cut the flower and adhered it to the bottom using a foam square and then glued down the chipboard pieces.


I used a journaling card to hand-journal my journaling and then added a few pieces of chipboard.


See the entire BOM DIA Collection here! Thank you for visiting today! If you would like to see more of this collection, check out Studio Forty! Also, Clique International has this collection in their shop on sale.


Tuesday, December 15, 2020

PLAY HARD MIXED MEDIA LAYOUT

Hello stencil lovers. I have a new addiction! I've been playing with my gel plate from Gel Press, getting messy and having so much fun. Seriously, this was such a fun spread and it was very therapeutic for me. I created this little by little for a few nights in a row. I'd add something and come back. I am going to try this the next time my mojo isn't quite there... sometimes, it really helps to just sleep on it.


Disclaimer: "The Crafter's Workshop provided me with product to create this project. The opinions I share are solely my own."

To begin, I dropped a small amount of acrylic paint onto the gel plate and then used a brayer to smooth out the paint. Then, I placed the journal page face down on the plate and smooth over the page using a brayer. I repeated this process several times with different color paints until I was happy with the result. While I was applying paint to the page, I'd rub off the excess behind the page... I thought it would be a good idea... create two projects at the same time using the same technique. Come back on January 5th to see the other layout I created!

Once I was done with the background, I grabbed some Light and Fluffy Modeling Paste and the TCW809 Ocean Window 12X12 stencil to create a fun design. I really like how the Light and Fluffy looks against the pretty colors! I used a palette knife to pull the Light and Fluffy through the stencil.


After it was completely dry, I used the Gel Medium to glue down the patterned papers and embellishments. I like using the gel, rather than a tape runner because the gel really holds everything in place.


Here are some close-ups. I'm so pleased with how this turned out and the colors!! It's so happy... After I was finished gluing down everything, I rubbed black ink along the edges to give it more of a distressed look.


I really like how the background turned out with the use of the gel plate. You cannot get this look just painting directly onto the cardstock. And this technique is super easy to do. Anyone can do it... you just have to jump in and START. :)

Thank you so much for visiting today!


Saturday, December 05, 2020

GIFT WRAPPING IDEAS

Hello! Nicole here with a fun tutorial on how you can use the Holiday Trimmings Slimline paper to wrap those tiny jewelry boxes... these giftboxes will certainly get you in the mood for the holidays! I had a great deal of fun making them, too!


Here is the other giftbox I made. I sent my sister's Christmas gift in this one... :)


To begin, I used a 8 1/2x11 white piece of cardstock as the base. Then I mounted the slimline Holiday Trimmings paper across the center of the layout horizontally. 


I wrapped the box with the paper and used scotch tape to tape it all together.


I created the Santa (from the Shake Your Merry Maker Stamp Set) by stamping the image onto white cardstock and then coloring them in. Then I ran the image through my Sizzix die cutting machine with the metal die to create my very own die cut.


I used a piece of ribbon to wrap around the box and tied the tag to the box as well. 


Next, I ran the snowflake patterned paper through the Sizzix with the tag metal die. Then I added a blue stone to the center of the tag to add dimension and shine.


I used a piece of ribbon to wrap around the box and tied the tag to the box as well. 


To complete the box, I tucked the Santa behind the ribbon. I'm so please with how cute these turned out... Looking forward to wrapping a few more gifts this season. 

Thank you for visiting today!


Thursday, December 03, 2020

TSHIRT CREATED WITH SUBLIMATION MARKERS

Good morning! I'm back today with a fun shirt I created for Edward for the holidays. :) For this project you do not need stamps! All you need is PicMonkey and Artesprix's Sublimation Markers! I designed an 8x11 canvas and added the graphics from the PicMonkey graphics to create the design of the shirt. Cool, right!? Come see how I made this fun shirt for my son.


*Disregard my son's messy hair... he really needs a haircut. :)


What are Artesprix Sublimation Markers?

Artesprix Sublimation Markers have the capability to transfer your drawings from a plain copy paper to any Polyester Fabric or Polyester Coated Blank with a unique process called, "'Sublimation." 

Materials:

Artesprix  Youth T-shirt

Black Artesprix Markers

Original and Pastel Artesprix Markers

Printed Design from your computer

Heat Tape

Protective Paper

Project Mat

Lightbox

Plain Copy Paper

Heat Source - Artesprix Heat Press

Step by Step Tutorial:

Step 1. To begin, I used PicMonkey to create the design on an 8/5x11 canvas. Then I printed the image out in color so I could see through the lightbox easily. I placed flipped the printed image over and placed it on the lightbox. Using Sublimation Markers, I colored in the images. I used a Black Sublimation Marker for the sentiment. 


The 8x11 copy paper is the perfect size paper and it fits nicely on the center of the Youth T-shirt. Once I was satisfied with the placement of the art work, I secured the design (face-down) to one side of the Poly-T Shirt using heat tape. Be sure to secure all sides of the image using heat tape to avoid slipping because if it's not secured, you may get a ghost image.


*Tip: Make sure there are not wrinkles on the shirt before placing the tshirt in the heat press. If there are wrinkles, you may end of with streaks! 

Place the Artesrpix Protective Paper in-between your shirt to prevent your design from transferring through to the other side of your garment. Now, you are ready to create a "Sublimation Sandwich", from bottom to top:

Artesprix Protective Paper

Artesrpix Poly T Shirt with design secured (face-down) on top, with Artesprix Protective Paper inside

Artesprix Protective Paper


Don't forget to set your Artesprix heat press timer for 35 seconds at 370 degrees. Place "Sublimation Sandwich" in the heat press. After pressing, allow the item to cool before handling. Also, make sure the knob is tight. You want as much pressure possible so that the heat press is hot enough to really make the images and colors pop.

I always love seeing the full reveal. I just love it! When I showed Edward the shirt, he said, "ah! cool!" I am loving the snowman!! And the Pastels look so pretty. 

If you're looking for more holiday inspiration, come back on the 17th. I will be sharing a cute Poly-Canvas Zip Case to use as a gift bag... :)

Thank you for visiting today!