Saturday, January 25, 2020

AWESOME AND YOU KNOW IT

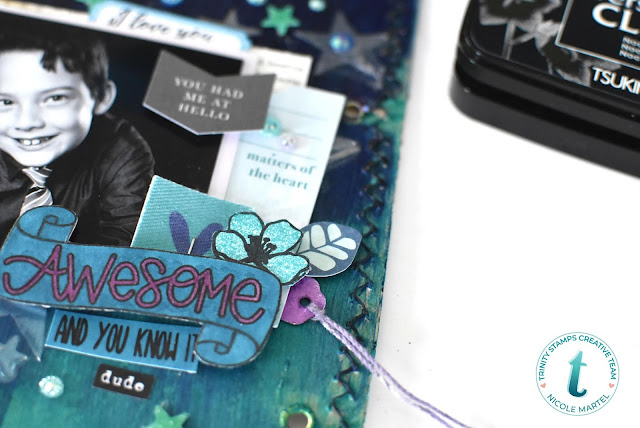
Good morning! It's finally the weekend and I plan on scrapping! Today, I'm sharing a fun mixed media art journal spread I created using Trinity Stamps' "Awesome Human" and "Love You Bunches" stamp set.

To begin, I stamped the Awesome Human image onto white cardstock and then I colored the stamp using a few markers in the section I wanted to use for the art journal page.


I painted the Chipboard Art Journaling page using a few Velvet Paints from Art Anthology. And then added the stars using a stencil and Metal Effects Medium.


I used the "I love you" sentiment from the Love You Bunches Stamp Set to stamp onto a label to use for an embellishment. I love layering embellishments etc.


I cut the "Awesome" sentiment from the Awesome Human Stamp Set to use at the bottom of the layout and then I added the flower from the Love You Bunches Stamp Set. I just felt that it completed the cluster of embellishments!


I used a few embellishments from Citrus Twist to add a few more layers. Then I added a few star die cuts from my stash and adhered them using foam squares to add dimension.


LOVE these Glass Beach Rainbow Gem Mix from Trinity Stamps. They are sooooo pretty!! A must for your stash!


And here is the final spread. I just love the color combo. What do you think?


Thanks so much for visiting today!! Hope you have a wonderful weekend!

Friday, January 24, 2020

TRINITY STAMPS WINTER RELEASE INSPIRATION BLOG HOP


Happy Friday friends and family! Welcome to Trinity Stamp's January Blog Hop. You should be arriving from Kelly Butler-Fusco's YouTube Channel! I am so excited to have this wonderful opportunity... I have enjoyed their stamps since they first opened their company! When you have time, go check out their shop! Until then, hop along and check out all of the wonderful new releases! There is something for everyone!


I was so excited to receive the Layered Heart- 6x6 Laser Cut 2-Piece Stencil Set! These stencils are great for creating colorful layers to your projects! For this layout, I used a few Blending Buddy Brushes, Stencils and ink pads to create two hearts to frame my photo! 


Along with the Layered Heart 6x6 Laser Cut 2-Piece Stencil, you can purchase the Nested Hearts Stand Alone 4 Piece Die Set. I used the heart to cover the center of the heart so I could make the layers. This die set also coordinates with our Layered Heart stencil set and our 4x6 A crafters heart stamp set.


This layered heart stencil set contains 4 different size hearts that can be used individually or together. The three smaller hearts in the set contain an etched line for the next biggest heart to make it easy to line up each layer. Our layering stencils are etched with their partnering stencil's design to make it effortless to line up your stencil just right. Use them with glitter or stencil paste, trace with a pencil lightly and watercolor, or blend ink through the stencil with our Blending Buddy Brushes! The possibilities are endless with our stencils!  


Also, new in the shop...we have Crafty Love-Mixed-Size Clay Heart Sprinkles. There is a variety of colors to chose from, perfect for all of your projects!


Here is a closer look at the stencils. Isn't it pretty!?


I used the 3x4 Senti-Mini Stamp Set to create the title at the bottom. LOVE the font with the heart.


The flowers were creating using the Spring Fling Florals Stamp Set. I simply colored an area of white cardstock with the markers, stamped the images over the ink and trimmed them out using scissors. I using this technique when I am low on certain embellishments. It works every time.


There is so much to see in today's hop lineup and of course prizes to be won! We will be giving away 3 prizes! 2 $15 gift certificates and 1 $25 gift certificate. Just comment on all of the stops today to be entered to win. Comments are due by 2/7/2020 11:59 PST. Winners will be announced on 2/10/2020 on the Trinity Stamps Blog.


Thank you so much for joining us today! Don't forget to hop along to check out the amazing inspiration using our products by these wonderful designers! Your next stop is Shanna Slater's blog! Here is today's lineup:


Enjoy!


Sunday, January 19, 2020

CRUISE MINI PAGES

Good morning all! I added a few more pages to my cruise album. I really had fun with this spread... I decided to take several embellishments and glue them directly to the photo, rather than create an actual page. It looks really neat in the album too.


While we were in Freeport, Bahamas, we stopped by the Perfume Factory. This was a neat experience! You can actually go into this shop and make your own scented perfumes! Or... you can just buy a few bottles. I grabbed a card while I was there so I can continuing supporting this factory!


One night, my husband called me out on the balcony and there were hundreds of stars in the sky. It was absolutely beautiful. I wish the photo turned out better...but it's very hard to get a picture, but it was amazing... seriously.

I kept our room steward's card to add in my mini as well. He took great care of us! While we were touring the island, I took a photo of this Lighthouse. 


And I think that is a wrap for my mini book! I may do one more page using the formal night pictures in the form of a collage, but that will be it! :) If you're wondering where I bought the mini book, check out Citrus Twist's Shop. They just got some new colors in and they are perfect for creating mini albums!

Thanks for visiting today. 

Saturday, January 18, 2020

HAVING THE BEST TIME WITH FRIENDS

Hello!! I don't know about you, but this week was LONG! It went by so slow and it was rough. I am so glad it's the weekend because I needed some scrappy time to unwind. I finally got a chance to use the January kit from Citrus Twist. Love this kit! What a great kit to start off the new year.


I've been itching to scrap these photo booth pictures since November! I finally had the right embellishments to scrap them! Totally fun. :) I love photo booth pictures. :)


I especially love how Citrus Twist Kits are chocked full of fun embellishments from chipboard, epoxy and puffy stickers to the journaling cards. They are awesome and the kits from month to month can be combined together! I usually mixed all of my months together and just go through my little storage box when I need embellishments.


And I couldn't help but share this cutie!! Henry is getting so big and he is such a happy baby. My sister got lucky with her first... he's always so smiley and I LOVE it!


I really like these fabric embellishments! I need more to add to my stash. Hopefully, there will be more in upcoming kits. LOVE, LOVE, LOVE the journaling card!


I used a die cut frame to frame the photo and then added a few more layers of patterned papers and die cuts behind it to add dimension. And the strip of hearts is another fabric embellishment.


I like adding a smaller page throughout my albums with some type of sentiment and some bling. It adds a nice touch.


And here's my last layout of me with my beautiful family. We just saw Little Women at the movies together and it was soooooo good!


Love the embellishments with the patterns. It has a nice flow to it. :)


Thanks for visiting today!

Tuesday, January 14, 2020

BE HAPPY TOGETHER

Good morning everyone. I am back with a colorful Travel Notebook Layout I created using a stencil and Coloration Spray (Salmon) from Art Anthology. I've been itching to buy new papers and stickers, but before I do... I am determined to use up my stash! So far, it's working and it feels great to save a few dollars...and use up the products I have on my shelf.


I mixed the Salmon Coloration Spray with Molding paste to create a pink shade. Then I covered the stencil using the medium. It steeped under the stencil a bit because it wasn't think enough...but that's OK. I just wanted to add some texture to the layout so it was fine.


I added lots of embellishments at the bottom to complete the layout. Since the photo was my main focus, I kept the design pretty simple.


Thanks so much for visiting today! Here's a process video!


Saturday, January 11, 2020

HERE WE GO

Happy weekend everybody! I just got home after spending some time with my family! Baby Henry is growing, growing, growing and we are so excited to be apart of his journey. I gave my sister this cute little mini I created for her. Something special that she can add to Henry's baby box!


I used lots of embellishments from Citrus Twist Kits to embellish each page. All of the embellishments came from several kits. I simply went through the kits to see if anything grabbed my attention and then I glued them down.


The album was super quick and easy to make. I printed my photos, cropped and adhered them back to back using adhesive. Then I punched a hole at the top of each page using a paper piercer and than I used twine to bind the album.


Jamie's photographer did a fabulous job with this photos. They are all so very beautiful. 


This is my favorite... Ginger looking, lovingly at my sister. So precious!


I was so glad I found "Woody" in Edward's baby box. I was afraid it was donated!! Jamie's husband Mat gave it to Edward when he was around 3 years old. Edward was really into Toy Story when he was little. I found him and gave it back to Mat so he could give it to his son! Little did I know that Jamie was going to add him to this adorable photo!! Oh, my heart!


Some pages are super simple... keeping the focus on the photos.


I left the journaling spaces blank so my sister could write whatever she would like in the mini.


Here is a snapshot of each page, side-by-side.


And there it is... a sweet, adorable mini I created in less than 1 hour for my beautiful sister. 
Thanks so much for visiting today!