Hello friends. I'm sharing a layout I created using Brutus Monroe's Simply Sweet Metal Dies and some of their mixed media mediums and stamps. :) I'm back at using up my stash again and it feels great.
I used papers from AB Studio to create this layout. I love their papers!! They are absolutely beautiful.
I used Brutus Monroe's butterfly dies to create a few butterflies from patterned paper and applied some candy coat to them to add some texture.
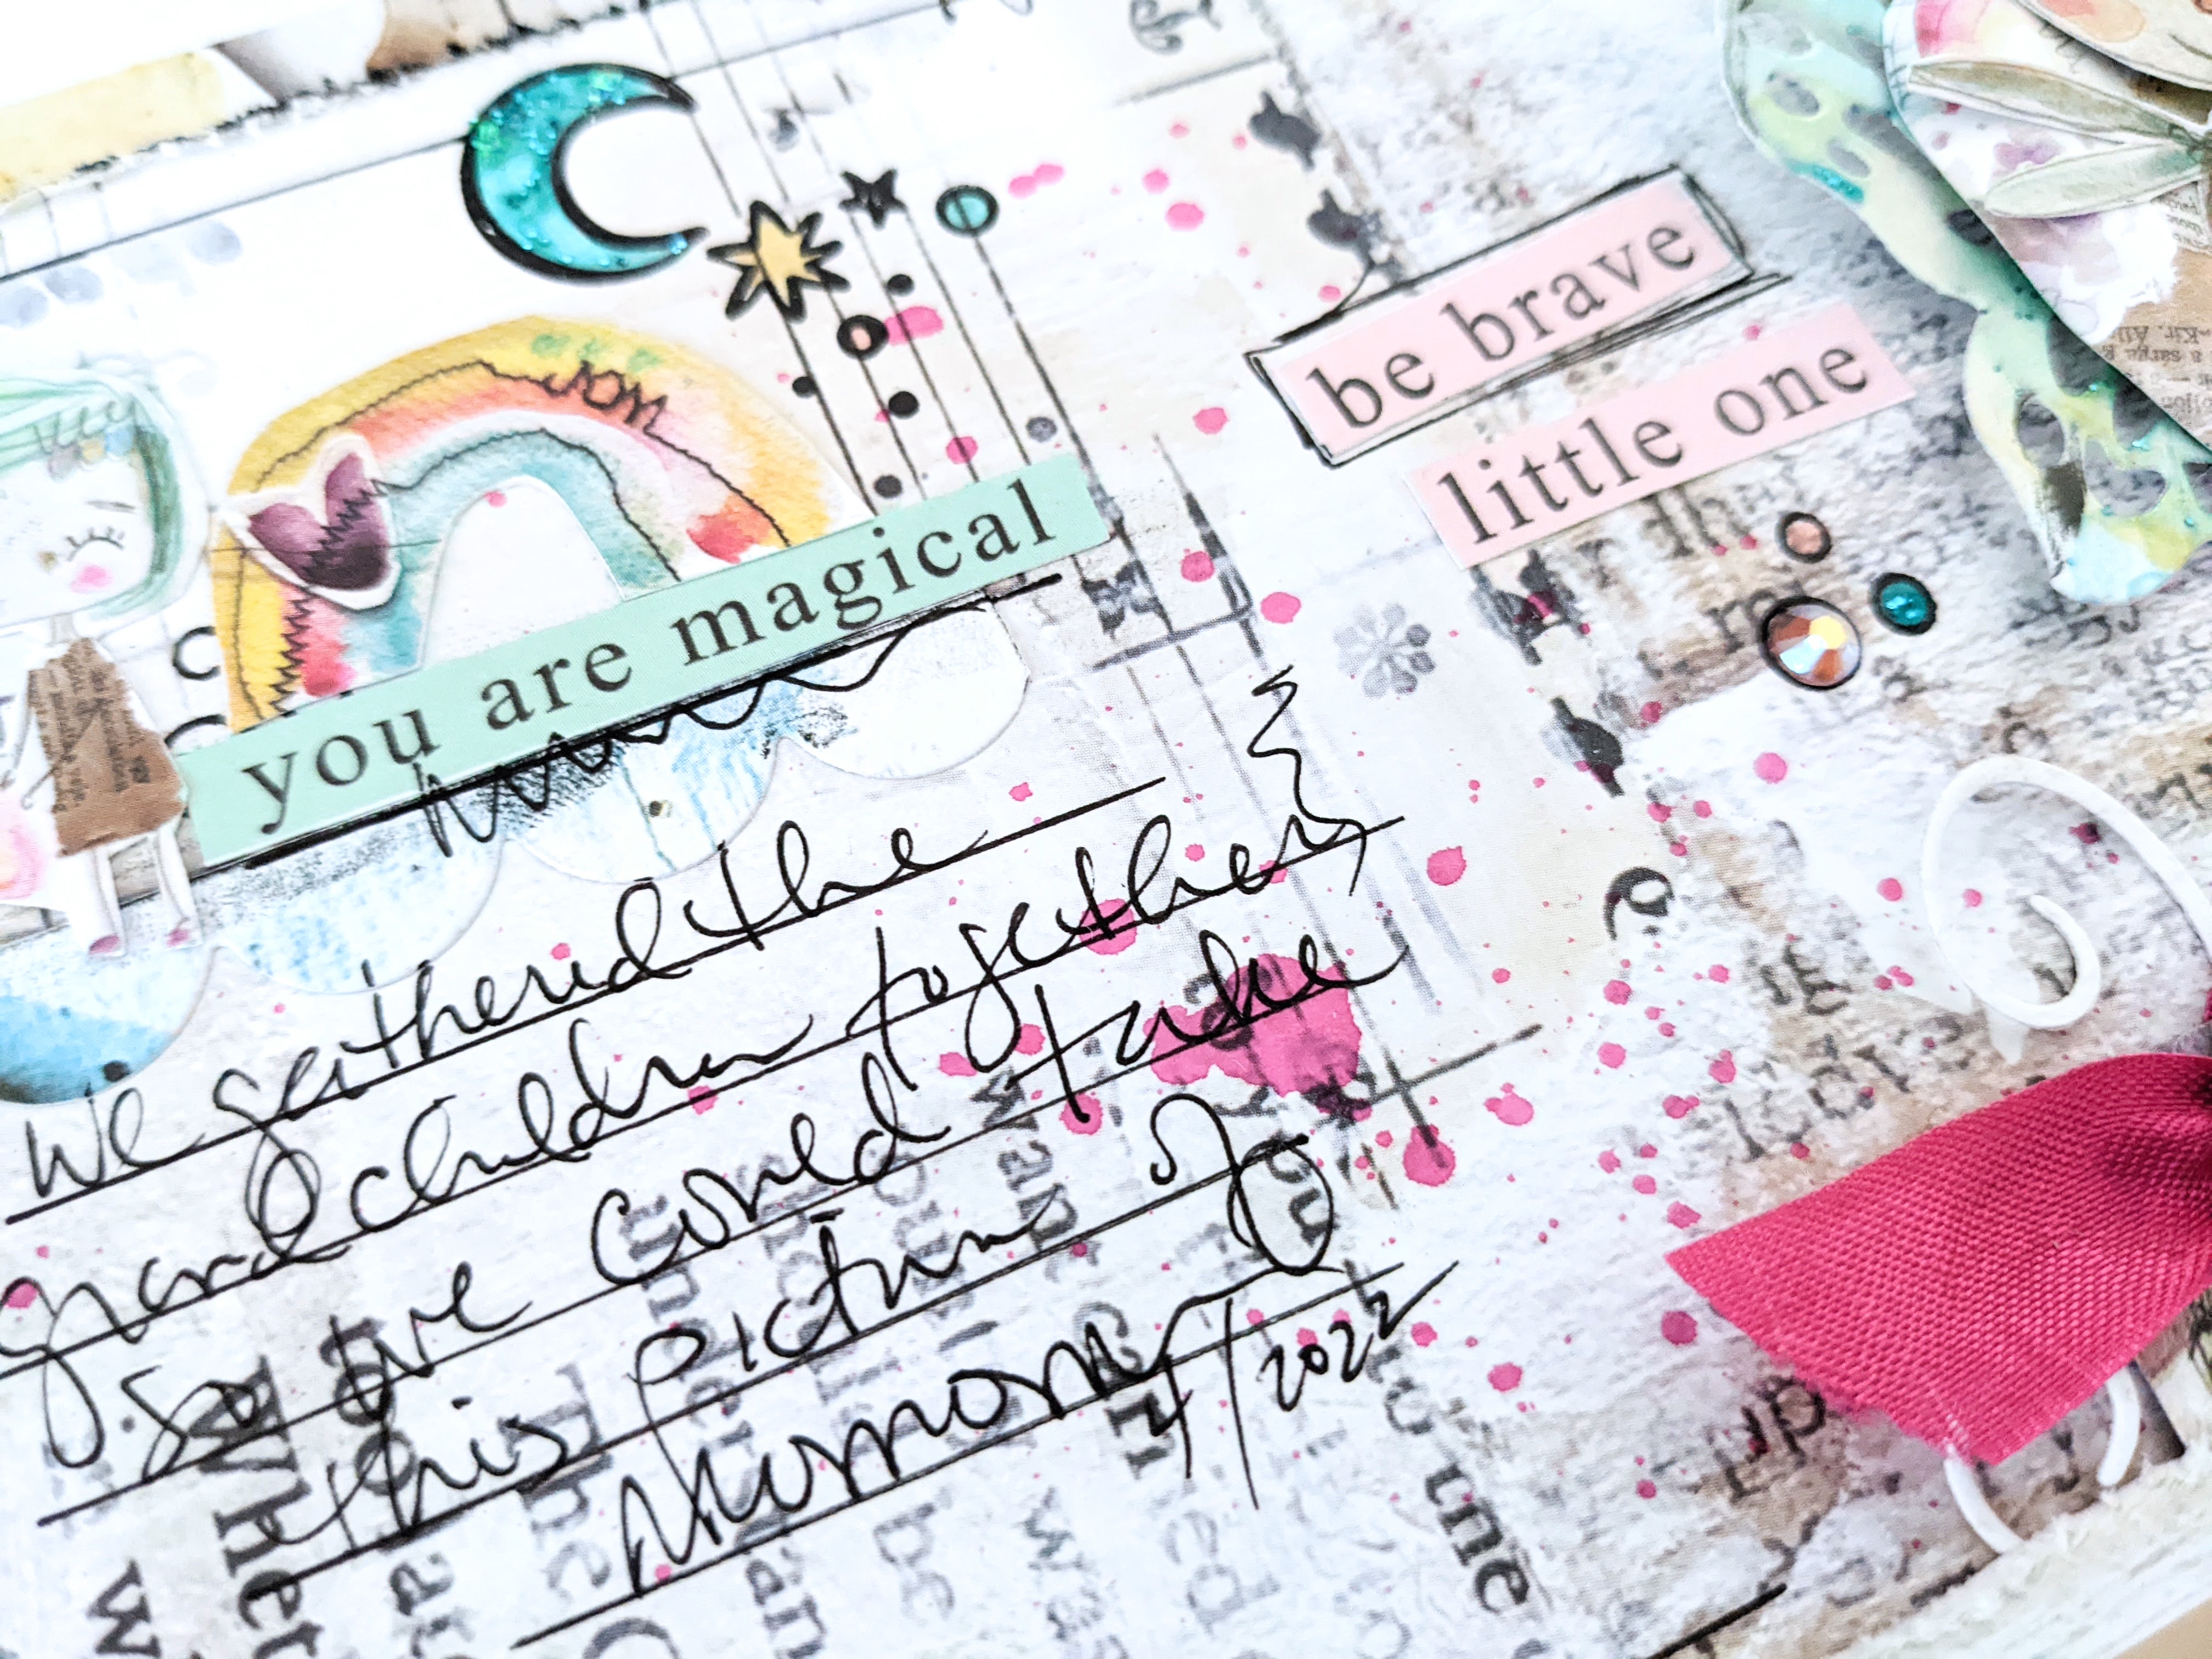
I fussy cut the little girl, rainbow and sentiment at the top. I splashed some fuchsia aqua pigment all over the layout and stamped the cluster of stars and circles all over. I colored them with alcohol markers and candy coat. So pretty!
That little bear is too cute for words. I added the butterfly behind him to add wings. He's so cute.
Initially, I stamped the "Enjoy the little things" onto the layout and it smeared...so I stamped it onto patterned paper and cut it out and mounted it to the layout using foam squares.
I used a variety of the dies to frame the matted photo...lots of pretty pieces in this set!
I'm loving all of the small details on this layout...yes, it's a bit messy/busy, but I just love it so much.
What do you think? Gorgeous right?! Check out the dies at Brutus Monroe by clicking here. They also have a variety of beautiful stamps! Please click here to shop at Brutus Monroe through my affiliate link. The price you pay will NOT be higher, but I may get compensated.
Happy Sunday friends! I created another layout for the Pinkfresh Studio. For this layout, I decided to play with softer colors.
This month's challenge is all about creating pretty backgrounds for your projects. This was super fun for me and easy...because I'm always using my stencils to create fun backgrounds on my layouts. I used a stencil and blending brush with Mango ink to create the scales in the background.
I love playing with pretty embellishments...and it's a great way to use some of your old stash...
Here is the full layout. Isn't his so pretty?! I just love it.
Happy Friday, friends! I hope you had a great week! I'm sharing a layout I created for Pinkfresh Studio's monthly challenge. It's been awhile since I participated in their monthly challenge so I thought I'd see what I come up with and I just love this design.
The challenge was to create a fun background for the layout.
I decided to cut the circles from patterned paper to use as a fun background. I love all of the layering, here.
I fussy cut the flowers from patterned paper and mounted them on to the layout using foam squares.
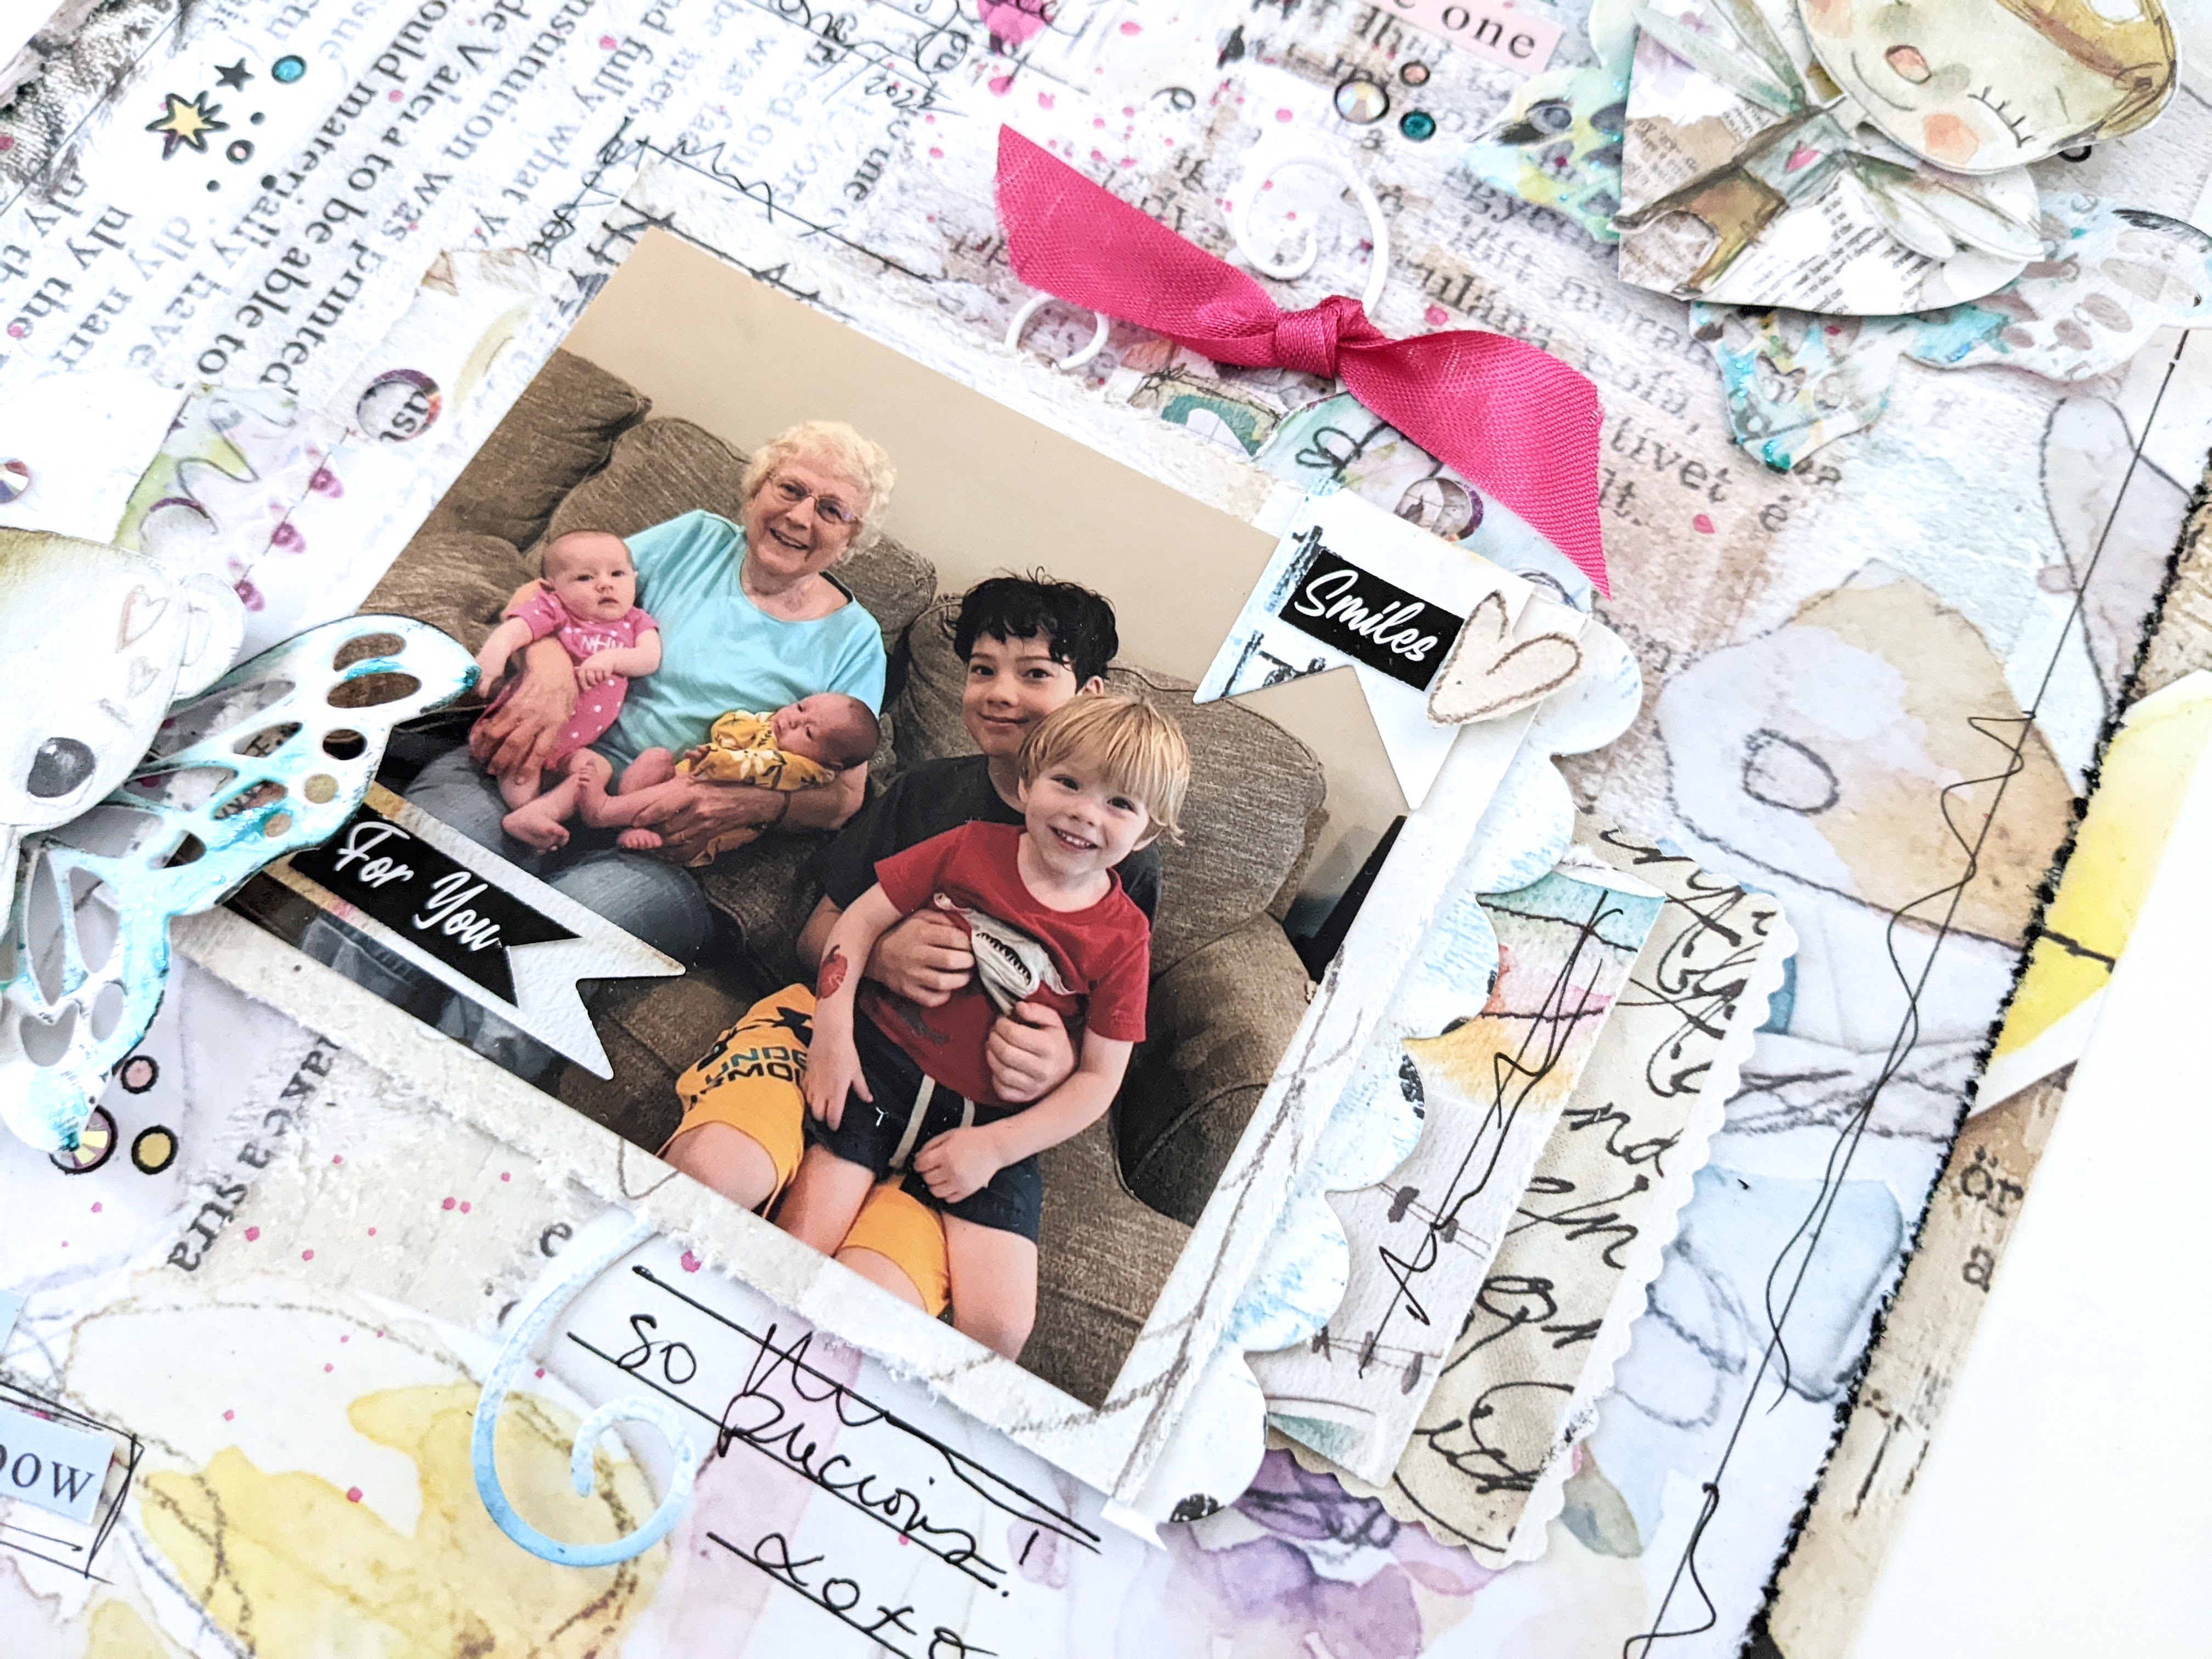
Hi everyone. This week has been rough. Yesterday, I needed to just go in my craft room when I got home and just unwind... so, I pulled out some papers from my stash and just played... I fussy cut hearts out of patterned paper, grabbed a favorite photo and really enjoyed the process. This relieved my stress so much!
For this layout, I used a variety of papers from AB Studio. I love their papers... I'm a mixed media artist who loves playing with paint etc...but there are times I just want to create and not get messy. These papers are perfect for that because they look like ink/paint...but it's paper! And the colors are beautiful.
I used a distressed to distress the edges of the paper and hearts to rough up the edges a bit. The big pink heart was cut from another piece of patterned paper. I LOVE layering paper together.
I cut the word strips from patterned paper and glued them down. The tag was cut from the tag cut-apart sheet. I punched a hole through the top and added a the pink ribbon. Lots of pink on this layout...:)
I cut the "you and me" sentiment from patterned paper to use as the title below the photo. Then I added some gems and the XO stickers across the hearts because I felt the layout was missing something.
This layout makes he happy....the hearts, beautiful colors and precious photo. What do you think? Thanks for stopping by today!
Good morning! A few weeks ago, my mom posted these pictures from the Oriole's game and I just had to document this memory! My grandmother will be 88 this year and we are so blessed to still have her! And she absolutely LOVES going to the Oriole's game. So...when I saw these pictures, it made my heart so happy.
To begin, I went through my stash of Heidi Swapp's stop the blur kits to grab all of my orange, green and black embellishments to use for this spread. I had a lot... since I've been subscribing for over a year now and all of the products from Heidi Swapp are super cute! I really enjoy this way of memory keeping. Some of my longtime followers probably noticed the slight shift in my style and that's because I'm doing what I enjoy... I still make layouts, but I mostly play in my memory planner because I find it more enjoyable than just creating a layout.
I also used a few stamps from Stamp Society! I had a hard time with the flags... Heidi makes it look easy. LOL But it works.
While I was laying down everything onto the page, I realized I needed some baseballs...and I had no stickers...so I pulled out my tiny circle punch and red marker and made my own. :) It's not perfect...but It's OK. And that black and white washi tape is my favorite.
I used a few more stamps on the die cut folder. The acrylic heart is from Elle's Studio. I love them.
I stamped the "oh my goodness" on the journaling card below the sentiment and added the black heart. Then I stamped the HAVE FUN. Super fun.
More stamping on this mini card. Also, I had a blue heart sticker in my stash that I applied orange ink over to make it work. You can't tell, can you. :) Make those products work for you, friends.
What do you think? Super cute, right! Thanks for stopping by today! I see you and I appreciate you.
Hello friends! I’m super excited to share three cards I created using the new Stardust stencil butter! These beauties are a must have…seriously… they look so pretty once they are completely dry. By the time you finish reading through this post, you are going to one to try them!
Disclaimer: “The Crafter’s Workshop provided me with product to create this project. The opinions I share are solely my own.”
I’m using pre cut/scored cards, but you can easily make your own with an 8×11″ piece of white cardstock. Cut it down to 5 1/2″ and score both pieces in half to create two cards. I used A2 sized card panels to stencil on separately so that they could be cut down for the card.
After I finished cutting the card bases and panels, I grabbed thePlatinum Stardust Stencil Butterand theTCW2341 Random Bubbles Slimline Stencil. I used a palette knife to pull the Platinum Stardust Stencil Butter through the stencil, carefully to prevent the stencil from slipping. Make sure you mix the Platinum Stardust Butter really good before each use because the glitter settles at the bottom after sitting for awhile.
Carefully, lift the stencil from the top right-side corner and pull the stencil towards you. Look at pretty that looks! Set it aside and let it dry. I actually made three cards at the same time and set them aside to dry in between each card. You can use a heat gun to speed up the drying process.
After the Stardust stencil butter was completely dry, I placed the panel inside a Misti to stamp just below the stencil. I like using a Misti because I don’t always get a crisp image the first time I stamp. Having a Misti has been a game changer for me. I stamped the “Wishing You Peace & Light” sentiment from the TCW2219 Happy Hanukkah Stampset using a dark grey ink.
I completed the card by adding a bow onto the card and then attaching the panel to the card base. Super simple, but oh so pretty! I didn’t realize until it was too late that my “g” didn’t get stamped all the way…but oh well.
I went back and forth on whether I wanted to use white ribbon or red…In the end, I decided the white would be better and I think I was right! What do you think?
The other cards I created were made similar to do this card. I’m a simple card maker…I don’t like to spend hours making a card…LOL. But I definitely appreciate those who do. For the other card, I played with the Champagne Stardust Butter. Gorgeous color! Again, make sure you mix it well!
Carefully lift the stencil off the card panel to prevent smearing. Look at how crisp that image is! So perfect and lots of gorgeous shimmer.
Set it aside and let it dry. Once it is completely dry stamp the XO XO and heart image at the bottom right-side corner using the TCW2200 Thank You Hearts Stampand tie a red bow around the card before mounting the panel to the A2 card base. I stamped “You’re so special to me” inside the card, rather than stamping the sentiment at the bottom of the card.
For the last card, I used the Marcasite Stardust Butter with the TCW2339 Petal Display Slimline Stencil. And there you have it, a nice set of cards!
I hope I inspired you today to try the new Stardust Stencil Butters! They are so pretty and I had so much fun playing with them. Thank you for visiting today!
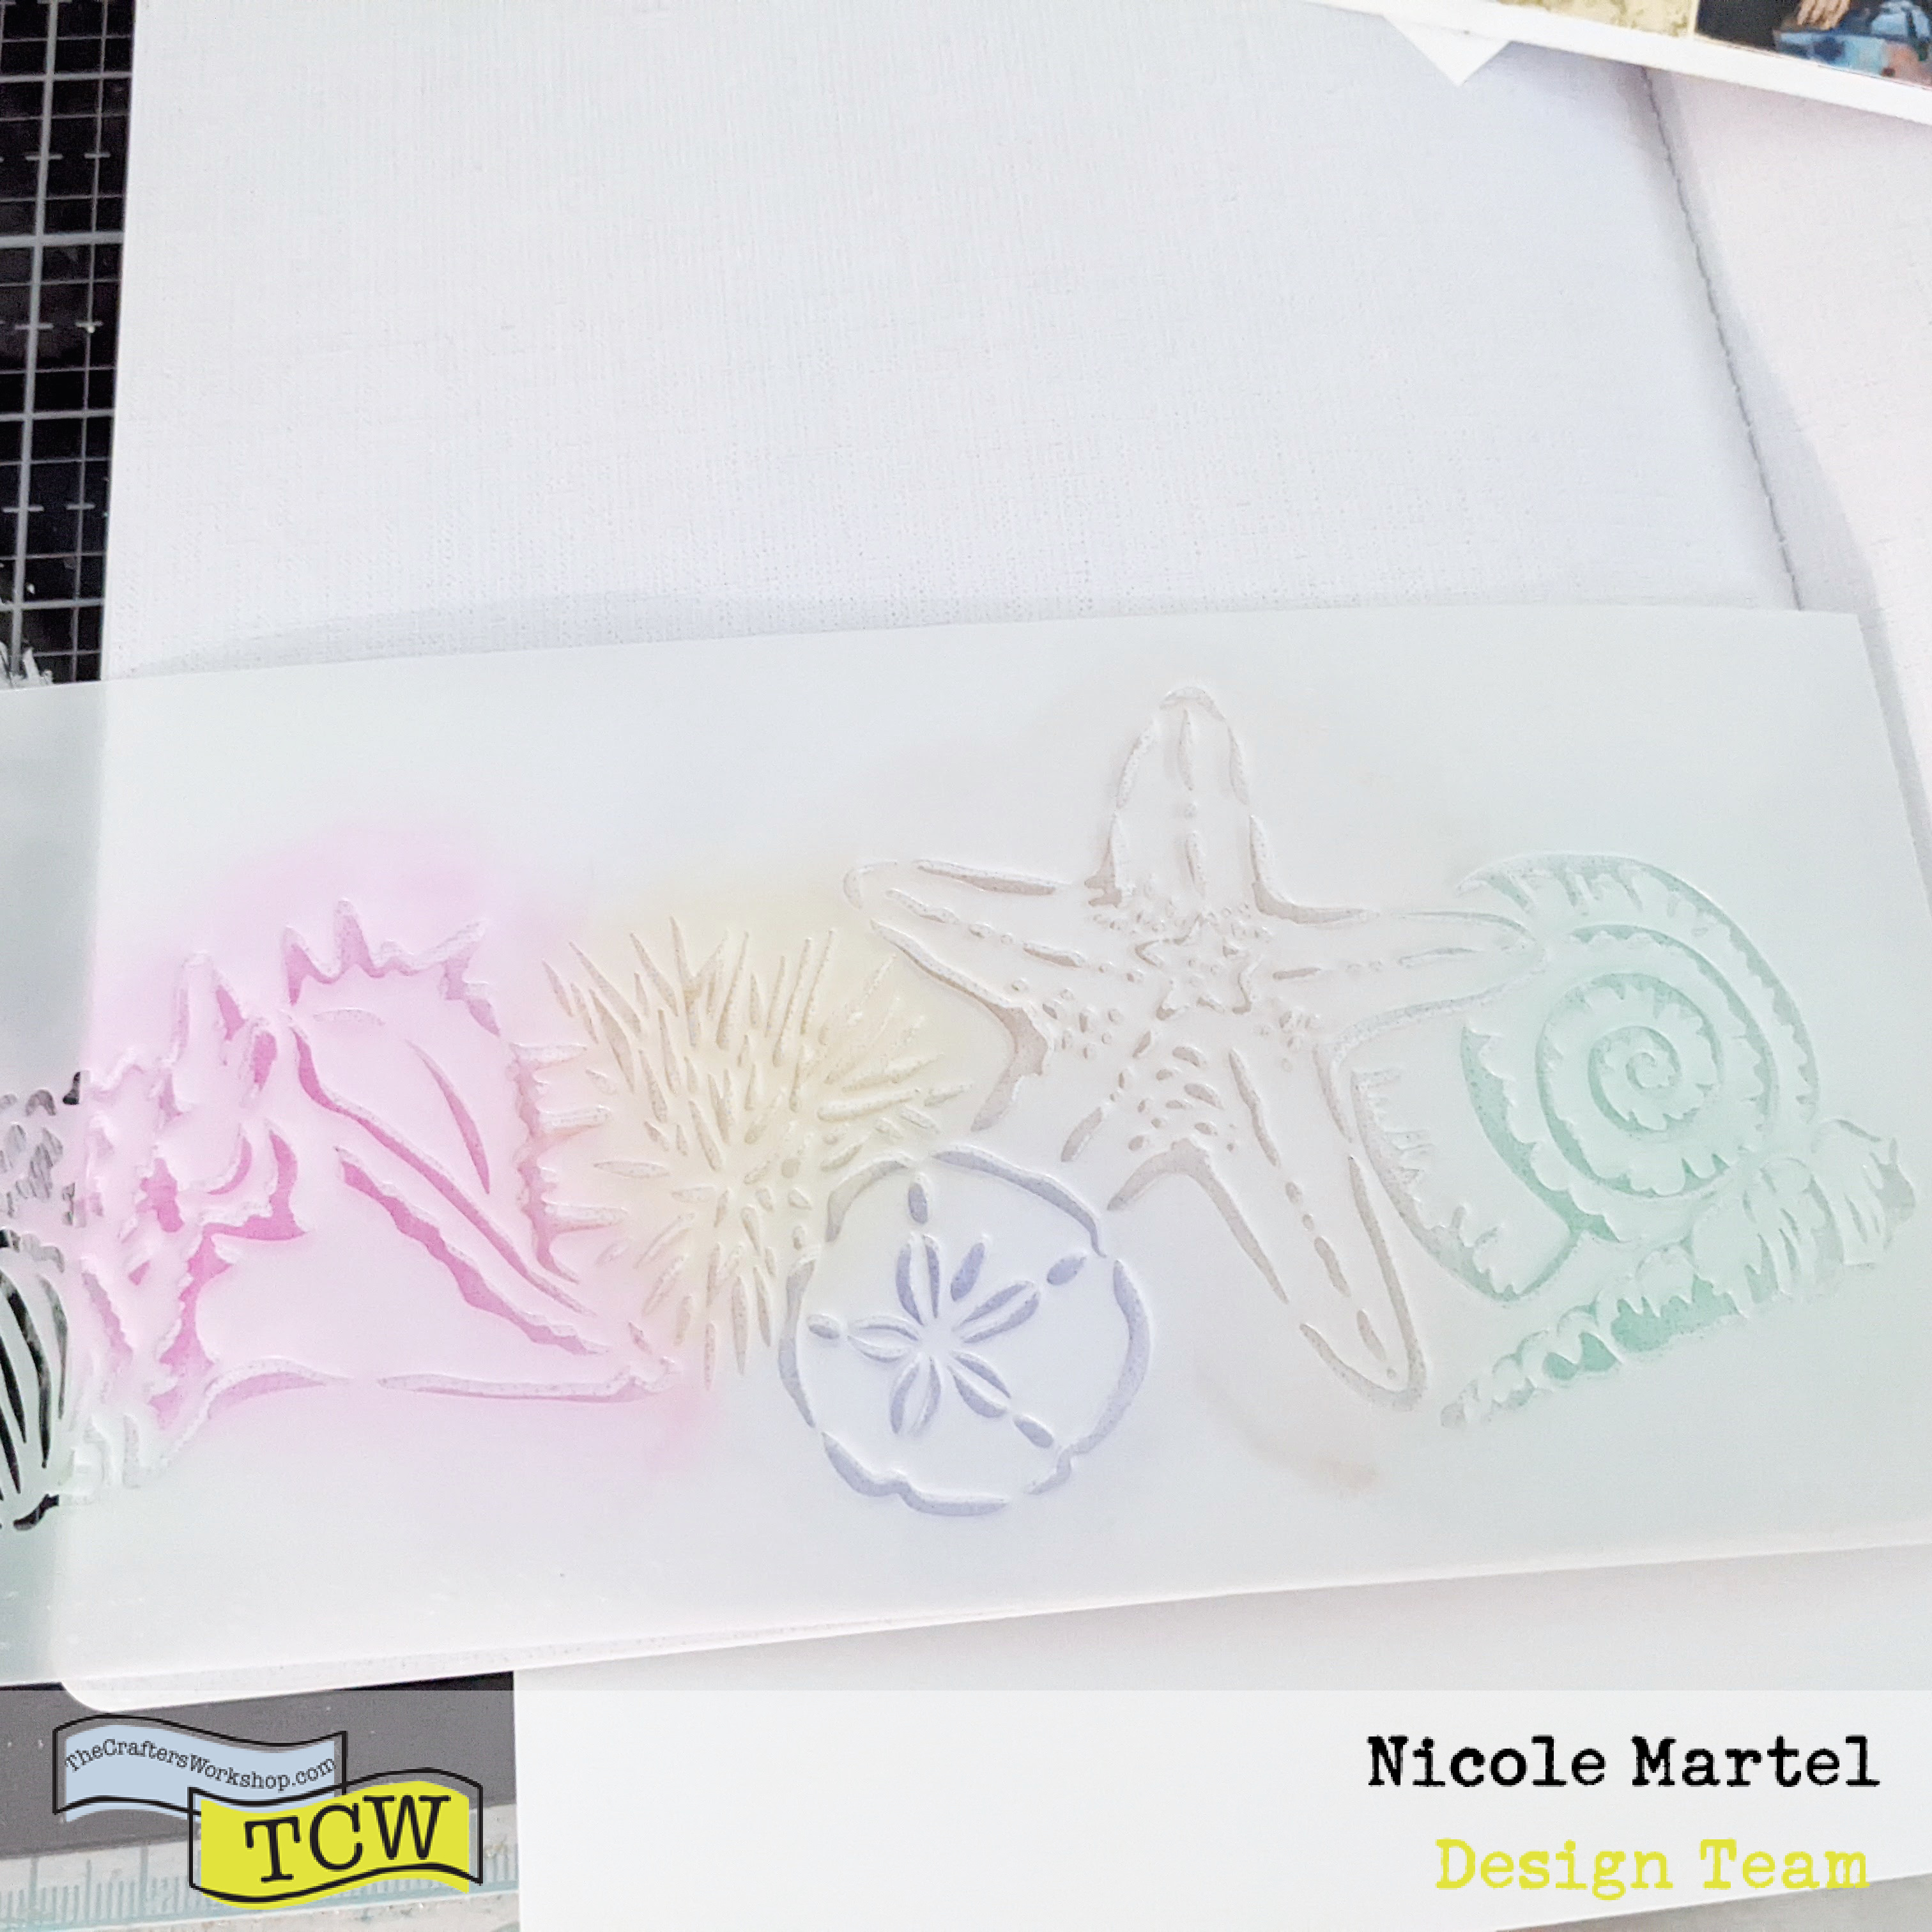
Good morning friends. I am squeezing in my last summer layout before I start working on some fall projects! I was excited to finally use the TCW2323 Shell Collection Slimline Stencil. It’s so beautiful.
To begin, I selected a few ink colors using colors from the embellishments. I tried to keep the colors close so that the layout wold have a nice flow. I used a different brush to blend in each color at the bottom of both pages. I do not recommend using the same brush…you don’t want the colors to mix.
I always get excited lifting the stencil to see the full revel underneath the stencil… Isn’t this beautiful. The details are so lovely.
I really enjoyed making this layout. The colors are so pretty and they make my soul happy! The stenciled border at the bottom really makes this layout pop. What do you think?!
I think I’m going to try this technique more often for my layouts. The stencil just add so much more details.
Thank you so much for visiting today. Don’t forget to check out the variety ofslimline stencilsavailable. They are truly my go to stencil these days and they work great in Memory Planners!