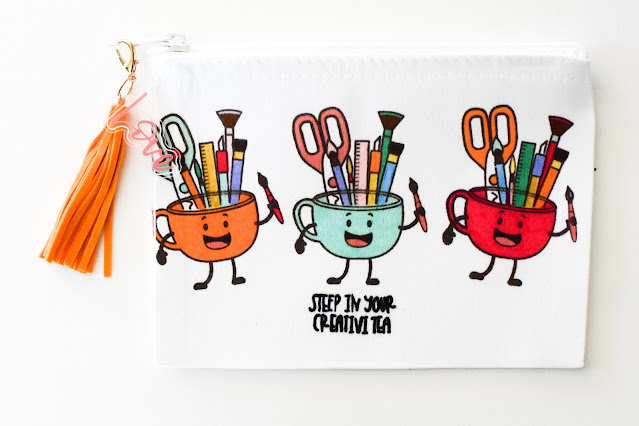
Nicole Martel on the blog with you today. I have been making fun projects with lots of pretty colors to make me happy. I’ve been feeling like I’m in a major funk these days… but this project makes me happy. Come see how I created this adorable Artesprix Poly-Canvas Zip Case. It’s super cute and I had a lot of fun making it. The little tea cups are so cute! I just had to find a way to use them.
Materials:
Plain Copy Paper
Heat Source: Artesprix Heat Press, Dry Iron, or Home Iron
Trinity Stamps Creativi-Tea 3x4 Stamp Set
What are Artesprix Sublimation Markers?
Magic Ink that transfers their beautiful colors from plain copy paper to a polyester product with a heat source. Iron-on-Ink Markers are the way to personalize sublimation, which is specially formulated inks that transfer only when activated with heat.

Step-by-Step Tutorial:
Step 1. Place the Poly Canvas Zip Case on a piece of plain copy paper and trace the outline using a pencil to determine the area that you have to work on.

Step 2. Next, I stamped the images onto the plain piece of paper using the Sublimation Ink Pad.

Step 3. To create the text, I used the print from the plastic part of the stamp set to trace over against the window. Most stamp sets have a plastic film with a black outlining of the images…They come in handy when sublimating!

Step 4. I Colored in the images using the Sublimation Markers.

Step 5. Turn your heat press on and set the temperature to 400 degrees Fahrenheit and the timer for 45 seconds.


Step 7. Create your sublimation sandwich. Cut two pieces of Protective Paper to cover your project on the top and bottom. Place a small piece of protective paper inside the canvas to prevent the ink from bleeding through the canvas. Place it inside the Heat Press (making sure the zipper is placed on the outer edge of the heat press) and close the machine. The Heat Press will beep indicating that your project is finished!

Step 8. While wearing protective gloves, lift the handle and remove your Poly-Canvas Zip Case. Place it on the Protective Project Mat and give it about 2 minutes to cool down. Gently remove a small piece to take a peek to make sure the colors are vivid.

Step 9. Embellish as desired.

If you love this, check out Allison’s Artesprix Poly-Canvas Zip Case, by clicking here. Click here to shop for Artesprix's products using my affiliate link!
Thanks so much for stopping by today!
**This post may contain affiliate links. That means that I may receive compensation if you purchase through the links I have provided. The price you pay for the product or service is not higher, but I may get compensated.**


No comments:
Post a Comment