Thursday, September 30, 2021

HELLO PUMPKIN MIXED MEDIA SIGN/THE CRAFTER'S WORKSHOP

Good morning! Nicole here with a fun mixed media sign I created for fall. Fall is my favorite time of year and I am so excited to share how I created this sign with you. For this project, I am using the TCW9072 Mixed Media Sign Board, TCW2425 Pumpkins in a Row stencil, TCW2435 Hello Pumpkin stencil and stencil butters


Disclaimer: "The Crafter's Workshop provided me with product to create this project. The opinions I share are solely my own."

To begin, I used washi tape to tape down the TCW2425 Pumpkins in a Row stencil to prevent the stencil from slipping while I am applying the stencil butters.


 Before applying the stencil butters, I had to decide which order I wanted the colors to go across the stencil. I used a palette knife to spread the Turquoise stencil butter through the different areas of the stencil first. When applying the stencil butter, try to use a generous amount of the stencil butter and apply it carefully through the stencil going in one direction to prevent the smears.


Here is what it looks like with all of the colors. So pretty!! Click here to see the full step-by-step tutorial over on The Crafter's Workshop's Blog.


Once the pumpkins were completely dry, I carefully removed the washi tape and then lifted the stencil up from the board.


To complete this sign, I used a few more stencil butters to create the sentiment and then I was done!


This was super fun to make!! I really enjoyed playing with the stencil butters. :) 


Thank you for stopping by today!


Tuesday, September 28, 2021

BLOWING LEAVES ARTESPRIX POLY-CANVAS ZIP CASE

Hello friends! I have been making fun projects for fall. It’s my favorite time of the year!! I just love it when the leaves change colors on the trees. They are so beautiful.  Come see how I created this adorable Artesprix Poly-Canvas Zip Case. It’s super cute and I had a lot of fun making it.


Materials:

Original and Pastel Sublimation Markers

Poly Canvas Zip Case

Plain Copy Paper

Heat Tape

Protective Paper

Heat Source: Artesprix Heat Press, Dry Iron, or Home Iron

Strong Glue

Ribbon

Precious Remembrance Shop Buttons

The Crafter’s Workshop’s Blowing Leaves Sign Stencil


What are Artesprix Sublimation Markers?

Magic Ink that transfers their beautiful colors from plain copy paper to a polyester product with a heat source. Iron-on-Ink Markers are the way to personalize sublimation, which is specially formulated inks that transfer only when activated with heat.

Step-by-Step Tutorial:

Step 1. Place the Poly Canvas Zip Case on a piece of plain copy paper and trace the outline using a pencil to determine the area that you have to work on. 


Step 2. Place stencil onto the copy paper and color in the images using the Sublimation Markers. 


Step 3. Using the Artesprix Heat Tape, tape your blank down to your design.

Step 4. Turn your heat press on and set the temperature to 400 degrees Fahrenheit and the timer for 45 seconds.


Step 5. Create your sublimation sandwich. Cut two pieces of Protective Paper to cover your project on the top and bottom. Place a small piece of protective paper inside the canvas to prevent the ink from bleeding through the canvas. 

Place it inside the Heat Press (making sure the zipper is placed on the outer edge of the heat press) and close the machine. The Heat Press will beep indicating that your project is finished!


Step 6. While wearing protective gloves, lift the handle and remove your Poly-Canvas Zip Case. Place it on the Protective Project Mat and give it about 2 minutes to cool down. Gently remove a small piece to take a peek to make sure the colors are vivid. 


Step 7. Glue desired embellishments onto the bag using strong glue and allow the glue to try.  


Step 8. Tie the charms through the zipper. 

If you love this, check out Tanya’s Peaceful Boho Artesprix Poly-Canvas Zip Case, by clicking here.   Click here to shop for Artesprix's products using my affiliate link!

Thanks so much for stopping by today!


**This post may contain affiliate links. That means that I may receive compensation if you purchase through the links I have provided. The price you pay for the product or service is not higher, but I may get compensated.**


Monday, September 27, 2021

THE BEST THING ABOUT BEING SINGLE/INK ROAD

Hello friends! I have a fun mixed media card I created using the Single and Savage stamp set from Ink Road and The Crafter's Workshop's TCW935  stencil.


To begin, I cut a piece of white cardstock to measure 6x8 and then I scored it in half. Next, I used inks and blending brushes through a stencil I had in my stash to create the fun background. Then, I added the sentiment in black. 


Next, I used a knife to cut a slit between the fold of the card so that I could feed the ribbon through the inside of the card.


Here is what it looks like...


I do this so the ribbon isn't bulky against the card. And I used a min stapler to staple the ribbon in place before tying the ribbon. I stapled a puffy heart sticker above the sentiment to fill in some of the space.


To complete the card, I glued a tiny gem next to the heart.


If you would like to see the entire stamp set, click here! Thanks so much for visiting today.


Saturday, September 25, 2021

WINTER/STUDIO FORTY

Hello friends! I know it might be a little early for winter depending on wherever you live...but today I'm sharing two layouts I created using the Frosty Season Collection. I'll be honest...I always have a difficult time scrapbooking winter photos!! I don't know why, but I do and I'm pretty sure this layout took me two hours to make. LOL


To begin, I cut the floral patterned paper to measure 8 1/2x11 and the snowflake patterned paper to measure 7 1/2x10 inches. I adhered them both together, placing the smallest cut to the center of the layout. I used the 6x6 sheet from the paper pad as a backing for the photos by adhering it to the layout diagonally. 


I used a metal die to create the tag and colored it in with an orange marker to bring out the orange sled in the photo.


I stamped the snowflake onto a scrap piece of patterned paper and then fussy cut it using scissors. I colored in the center using an orange marker and then added the gem. I did this because initially, I stamped directly onto the photo and it smeared...so then I had to figure out how to cover my mistake. I used a clear sticker snow flake below the big snowflake. I wasn't taking any chances of stamping onto the photo again. :)

I created the little mittens and had using the stamps! Super cute! And fun to make... stamps are great for creating your own personalized die cuts!


I wanted a big title at the bottom...so I used some acetate stickers that I had in my stash. Then I added the chipboard.

I'm so pleased with how this layout turned out. It just scream winter! 


Click here to see the entire collection. It's super pretty and perfect for documenting those winter memories and even the holidays! Click here to grab some goodies! Save 10% on your purchase with coupon code: NICOLE10 .  Thanks for visiting today!


Friday, September 24, 2021

OCTOBER PLANNER SPREAD/STUDIO FORTY

Good morning! Nicole here with a planner spread I created for October using the beautiful embellishments from the Herbarium Collection. 


I used a light purple alcohol marker to color across the top of the planner pages. Then I colored in the die cut vase using a burnt orange color marker.


I added a few clear stickers, chipboard and pieces I cut from the patterned paper into a fun cluster on the right-side spread. Super pretty!!


Now, I just need to start making plans for October! :) So far, there's not much going on except for the weekend I plan on driving to Pennsylvania to visit my bestie! We plan on going to a fall festival so I'll have to take some fall pictures to use with this beautiful collection. Click here to grab some goodies! Save 10% on your purchase with coupon code: NICOLE10.

Thanks for visiting today!


Wednesday, September 22, 2021

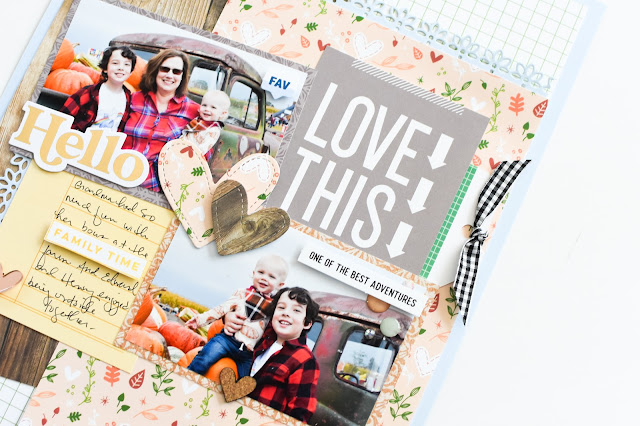
ONE OF THE BEST ADVENTURES/ELLE'S STUDIO

Happy fall ya'll! I love the fall. Seriously, it's my favorite season. I just love to watch the leaves change and I love the fresh, cool air!


I created this layout using Elle's Studio's Autumn Day's Paper pack and a variety of embellishments


The sticker dots are from Studio Forty. They are my favorite... the colors are so soft and pretty. I used Elle's Studio's Metal Heart Dies to create the flowers in the center of the layout. 


I stamped the "family time" sentiment onto white cardstock using yellow ink and then cut it out to use as a die cut for my journaling block.


I punched the floral border from the Lacey Edgers metal border die from Pinkfresh Studio to add at the top of the layout as well as the left-side of the photo for more interest. 

This layout melts my heart...those little cutest really make the layout pop. :) Thanks so much for visiting today!


Tuesday, September 21, 2021

SENDING LOVE ACROSS THE SKIES/THE CRAFTER'S WORKSHOP

Good morning friends! I've been playing with my stamps from The Crafter's Workshop and it's been fun! Stamps are great for filling in white space, making die cuts or just adding a few sentiments here and there to help tell your story!


Disclaimer: "The Crafter's Workshop provided me with product to create this layout. The opinions I share are solely my own."

Awhile ago, I received some pretty papers from 49 and Market and I held onto them because they are too pretty to use... but then my sister had a photo shoot of her beautiful little family and I immediately wanted to use the papers and embellishments because they matched the photos perfectly! I love when that happens.


To begin, I added layers of die cut cards and labels onto the base. Then I matted the photo onto patterned paper and added the die cut frame over the photo to frame my sister's family. Next, I fussy cut the sea shells from a card and popped them onto the framed photo using foam squares to add dimension. I mounted everything down and then I glued the little gems next to it to add some sparkle.
 

I used black ink to stamp the "Sending Love Across the Skies" sentiment from the TCW2209 Beautiful Sentiments Clear Stamps. Then I added the cream epoxy heart sticker above the sentiment. I stamped "You are a treasure" within the tab, which is from the TCW2205 Sprinkle Kindness Clear Stamps.


Next, I wanted to add something to the top right-side of the photo so I grabbed the TCW2200 Thank You Hearts Clear Stamps and stamped the hearts in black. I colored them in with alcohol markers and added the xo's using a white gel pen. Then, I added the epoxy hearts. I love how this cluster of hearts looks on this photo.


I stamped the border of hearts at the bottom just for fun and then colored them in using a light pink marker.


After I glued down the lace across the photos, I felt that I needed to add something else to help pull this layout together. Therefore, I stamped the butterfly from the TCW2210 Uplifting Sentiments Clear Stamps in orange ink onto a scrap piece of patterned paper and then fussy cut the image using scissors. I mounted it to the layout using foam squares. I tucked a few labels, slightly behind the photo to add a few more layers.

Now do you see why you need all of these beautiful stamps?! They sure do come in handy. Thank you for visiting today!