Saturday, July 31, 2021

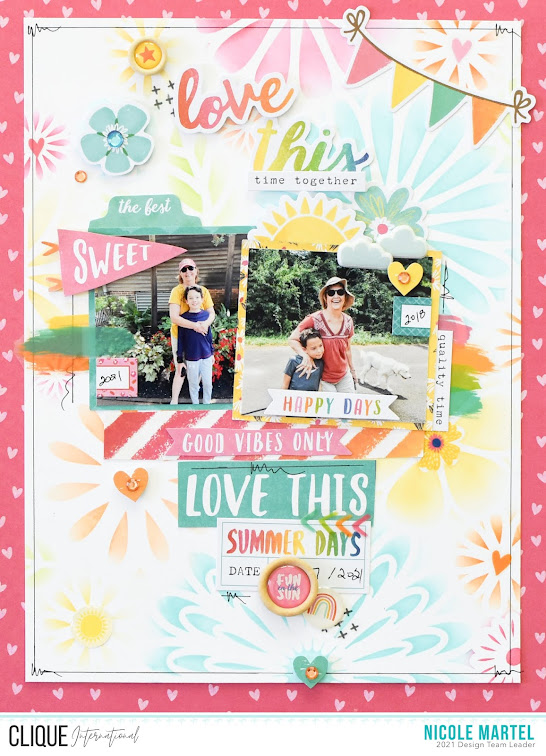
LOVE THIS TIME TOGETHER

Hello friends! Happy Saturday. I manage to find some time to play with the Sunkissed Sampler Kit and the Modern Documenter Sunkissed kit to create this fun layout! And I am going to share with you how I created the background, step-by-step! Super easy and fun to do!

Disclaimer: "Clique International provided me with product to create this layout. The opinions I share are solely my own."

To begin, I taped down the ends of the Gathered Flowers stencil from The Crafter's Workshop to the glass mat to prevent the stencil from slipping when I blend the inks through the stencil.


Next, I used a blending brush and the Cummerbund Ink, Lime Rickey, Tiara and Tiki Torch from Catherine Pooler to create the florals. I really like using Catherine Pooler's inks because the colors are so vibrant!! Make sure you use  a different brush in between colors so that the colors do not mix.


Now, carefully remove the stencil and washi from the paper. I cut the floral paper to measure 7 1/2"x10" and then I cut the heart patterned paper to measure 8 1/2"x11". I decided I wanted to have a little bit of patterned paper framing the layout.


And then I added all of the pretty embellishments. Some of the embellishments were mounted down using foam squares.


One of my favorite things to do is add layers of die cuts and stickers onto my layouts. It's my favorite part of the process-playing with embellishments! 

More layers at the top. I used a black pen to create a thin border around the layout and added a few lines around the photos with some hand scribbles to make it look like stitching. 


I really enjoyed making this layout. The colors and embellishments are so happy... I just love the whole vibe of this layout! What do you think? Thank you for stopping by today. We still have a few Sunkissed Sampler kits in the shop if you wanna snag one!


Friday, July 30, 2021

HAPPY MIXED MEDIA LAYOUT

Hi everyone! Nicole here with a fun mixed media summer layout I created using the Good Vibes Paper Collection and the Bom Dia Die cuts. I was really excited to see the Good Vibes Collection in my DT box. It is one of my favorite collections and I really enjoyed the process of creating this fun layout.

To begin, I sprayed blue ink onto watercolor paper and waited for it to dry. Once it was dry, I used a blending brush, orange ink and a star stencil to create the stars. Then, I splashed a little bit of red ink all over. I let the ink dry completely before adding all of the pretty papers and embellishments!


The die cut elements from the Bom Dia Collection is so perfect for scrapbooking special memories such as a boy flying his kite on the beach. I used a variety on this layout... I couldn't help myself. :)Just look at all of the beautiful dies from this collection... I can assure you...there are a lot more, but I had to refrain myself. I think I added enough, don't you think? LOL

While I was going through my stash of chipboard, I found a green and white speech bubble chipboard and since I didn't want to stamp on it... I didn't want the ink to smear... I added another chipboard to it. I love the chipboards layered together. Don't you love when you experience happy accidents? 


I layered some chipboard frames over the photos and then fussy cut the "fly a kite" sentiment from the Good Vibes Collection. I was determined to find a way to use that sentiment on this layout. I cut the "here and now" and mounted it next to the frames using foam squares. So cool!


I added a sticker dot to the starfish with a gem to the center. Then, I stamped the little hands from the Summer Love stamp set to each side of the "happy" die cut. Super fun!!

I used the same Summer Love stamps to add the robe corners at the top and bottom of the layout. After I looked at this... I realized that the design of the layout looks like a kite and that was totally by accident! So I added the string at the bottom using the Oh Baby Stamp Set.

This layout makes me so happy... I just love how happy it looks, mimicking Edward's joy perfectly.


For my next layout, I used a variety of papers from the Journal Stories Collection. I wanted to created a pretty, monochromatic layout for this picture in particular to really showcase the mood. Also, I kept it very simple so that the main focus would be the photo.


To begin, I cut the photo down to 4x4 and then added a variety of Journal Stories papers behind the photo to create a fun frame. I tore the edges of a few to add texture to the layout.


I added the chipboard frame slightly behind the photo frame and then stamped the flower onto cardstock and fussy cut it out to use as an embellishment. I added the sticker dots for fun. I just love them...

stamped the rope corner frame using black ink to frame the photo even more... And I used the Summer Love Stamp set to add the bubbles and sentiment across the bottom and top of the layout.

Super simple, but fun! What do you think? Which layout is your favorite and why? Leave us a comment.

Click here to grab some goodies! Save 10% on your purchase with coupon code: NICOLE10. Thanks so much for visiting today!


Monday, July 26, 2021

LIFE SUCCS, BUT YOU DON'T! CARD

Hello everyone and Happy Monday! Today I'm sharing a fun card I created using the Not a Hugger Stamp Set. I love this stamp set and all of the fun sentiments! I can't wait to find some more time to create a few more using all of the fun sentiments!

To begin, I cut a piece of white cardstock to measure 6"x8" and scored the cardstock in half to create the base. Next, I stamped the images onto the card using black ink.

I used Altenew's alcohol markers to color in the images. This is my favorite process of the cardmaking... I love coloring.

To complete the card, I glued down the cork heart and pink gem below the sentiment. Love how pretty this looks! 


Thank you for visiting today!


Sunday, July 25, 2021

ADVENTURE IS OUT THERE/ELLE'S STUDIO

Just popping on to share this layout I created using Elle's Studio's July kit and add-ons for this month. I played with their patterned paper pack and embellishments. The color scheme screams summer to me.


I used the "The world is yours to explore" stamp from Citrus Twist to stamp within the label to use as an embellishment and then I colored in the "explore" word using an alcohol marker. I also stamped inside the tab.


While looking though my stash of chipboard stickers I found a few that matched well with the theme and color scheme of this layout. I  used the scribbled stamp from Studio Forty to stamp the scribbles for fun.


I added a few layers of patterned paper strips to the side to add dimension and then cut a little tiny strip to stick behind the journaling card and topped it off with a puffy heart sticker and gem. I love playing with embellishments!


I added a piece of coral thread through the tag and the chipboard speech bubble at the top to fill in the white space. 


Thanks for visiting today. Hope you found some time to relax this weekend!


Friday, July 23, 2021

SO EXCITED/FANCY PANTS DESIGNS

HAPPY FRIDAY! How was your week? Mine was loooooong. I'm looking forward to the weekend. Sadly, I'm working tomorrow so my weekend won't start until 1:30. I have had this layout saved on my computer for some time now and I forgot to share it! I made this layout using pretty papers and enamels/buttons and die cuts from Fancy Pants Designs Peachy Keen Collection. 


Since I was running low on the ephemeras from this collection, I searched through my metal dies to see what I could use and I came across this gorgeous floral die I purchased from The Stamp Market. I love their dies. They are perfect for creating embellishments on the spot! I added the enamel dots to the center for fun.


The stickers words are from my stash of stickers from Studio Forty, Vicki Boutin, Pretty Little Studio and Mintay Papers. 


I really love the wooden buttons from Fancy Pants Designs. They are super cute!! 


I used my Sizzix and a leaf die to create the leaves to tuck behind the photo to make it more pretty. Also, notice how vibrant the spray ink is in the background? That is because I used watercolor paper. The watercolor paper doesn't soak up all of the color, whereas watercolor paper really holds the color! You can grab some watercolor paper here at The Crafter's Workshop. 


I used the same collection and the Hello die, Ready to Bloom Card Cover Die (flowers) along with the leaflet dies to create these pretty 3x4 cards! I love how pretty these turned out. They were donated to Scrapbook.com for the Cards for Kindness.


Hope you have a fantastic weekend. Thanks so much for visiting today!


Tuesday, July 20, 2021

SUMMER TIME TIER TRAY

Hi everyone. I have another fun summer themed tier tray to share with you. I created this fun project using a variety of stencils and mediums from The Crafter's Workshop and the Tier Tray and Kit is from Foundation Decor. If you haven't had a chance to check out their Tier Tray Kits, you are missing out! They have the cutest kits and beads... add some stencils and mixed media mediums to them and the possibilities are endless.


 I have a tutorial on how I created these pieces up on The Crafter's Workshop's Blog. Check it out here!


I used acrylic paints from Bad Girls Couture to paint the wooden pieces from the Lemonade Stand Kit. Once the pieces were completely dry, I used stencils to create the pretty patterns on each piece. The Summer Lemon was purchased separately.


Seriously... isn't this the cutest Lemonade stand ever? I just love it so much. :) The clear stickers are from Studio Forty and the "Hello Summer" speech bubble chipboard embellishment is from Elle's Studio.


I used a gel medium to clue the pieces down. I love using gel mediums because they are super strong once dried.


I struggled with this lemon... I spent a lot of time on this piece... it just didn't come easy for me, but I like the end result!


I decorated the back using another stencil and paint... just for fun. It was meant to be a fish, but it didn't work out... LOL.


Thanks so much for visiting today! See the full tutorial here!


Monday, July 19, 2021

HELLO FRIEND MIXED MEDIA LAYOUT

Good morning! Nicole here with a fun mixed media layout I created using the Basic Collage Elements Vol 1 and Fancy Font Sentiment Stamp Set. I totally had fun with this layout and tried to think outside of the box with something cool to do with the stamps. 


To begin, I stamped the hexagon images onto white cardstock and then I colored them in using alcohol markers. I used a variety of the Basic Collage Elements to stamp within the hexagons. I really like how this turned out!! I especially like the color scheme. I tried to pull in my friend's purple hair... :)

Here is a closer image of the hexagon. Isn't it pretty?


To complete the layout, I added a few additional embellishments from Elle's Studio and I created the stencil background using The Gentle Leaves Slimline stencil from The Crafter's Workshop to frame the photo.


Thanks so much for visiting today!